You might feel a bit nervous about tackling car AC repairs, but you can handle the basics with the right approach. Most beginners start with a few must-have car air conditioner repair tools. You’ll want a good manifold gauge set to check pressure, a vacuum pump to clear out moisture, and a flush kit for cleaning the lines. A UV dye kit helps you spot leaks fast, while a digital thermometer lets you track temperature changes. These tools make complete ac repair much easier, even if you have limited experience. You don’t need fancy equipment or years of training—just a willingness to learn and a little patience.
Essential Tools
Getting started with car air conditioner repair tools is easier than you might think. You don’t need a huge toolbox or fancy gadgets. Let’s break down the basics so you know exactly what you’ll need for your first ac project.
Basic Hand Tools
Screwdrivers
You’ll use screwdrivers for almost every ac repair. They help you remove panels, loosen hose clamps, and access tight spots. A set with both flathead and Phillips tips covers most jobs. Keep them handy because you’ll reach for them often.
Wrenches and Pliers
Wrenches and pliers are must-haves for any car air conditioner repair tools kit. You’ll use them to loosen and tighten fittings, remove stubborn bolts, and handle small parts. A socket set makes things even easier. These tools let you take apart and put back together different parts of your ac system.
Tip: Pliers and wrenches are super versatile. You’ll use them for more than just ac repairs!
Car Air Conditioner Repair Tools
Manifold Gauge Set
Manifold gauge sets help you check the pressure in your ac system. You’ll use them to diagnose problems and make sure everything runs smoothly. They show you if your system has the right amount of refrigerant. This tool is a must for anyone serious about car air conditioner repair tools.
Vacuum Pump
A vacuum pump removes air and moisture from your ac lines. Moisture can cause big problems, so you want those lines dry before adding refrigerant. This tool keeps your system running cool and prevents future damage.
Flush Kit
A flush kit cleans out old oil and debris from your ac lines. If you skip this step, leftover gunk can clog your system. Using a flush kit helps your repairs last longer and keeps your ac blowing cold.
Leak Detector
A leak detector helps you find leaks fast. Some kits use UV dye, while others use electronic sensors. You’ll spot leaks before they turn into bigger problems. At-home leak detection kits cost about $145, which is much less than paying for a professional diagnosis.
Here’s a quick look at the average costs for some essential car air conditioner repair tools:
Tool | Average Cost |
Leak Detection Kit | $145 |
AC Vent & Duct Cleaner | $10 |
Professional AC Diagnostics | $200+ |
Hose Repair (Pro Service) | $350+ |
Safety Gear
Gloves
Always wear gloves when working with car air conditioner repair tools. They protect your hands from sharp edges, chemicals, and hot parts. Choose gloves that fit well so you can grip tools easily.
Safety Glasses
Safety glasses keep your eyes safe from splashes and flying debris. Make sure your glasses are splash-proof and meet the ANSI Z87.1-2015 standard. You don’t want to risk your eyesight while working on your ac system.
Note: Always check the Safety Data Sheets (SDS) for any chemicals you use. Follow your car’s service manual for special warnings. Good safety habits make every repair easier and safer.
You can find most car air conditioner repair tools at auto parts stores or online. Investing in these tools saves you money in the long run. Professional repairs can cost hundreds, but with the right tools, you can handle many ac fixes yourself.
Safety Precautions
Before you start any car AC repair, you need to think about safety first. Working with refrigerant and electrical parts can be risky if you don’t follow the right steps. Let’s break down the most important safety tips so you can work with confidence.
Refrigerant Handling
Refrigerant is what keeps your car cool, but it can be dangerous if you don’t handle it the right way. Here’s what you need to know:
Always wear gloves and safety glasses when working with refrigerant. This protects your skin and eyes from burns or irritation.
Work in a well-ventilated area. Refrigerant vapors can be harmful if you breathe them in.
Use a leak detector to check for leaks. Some refrigerants are colorless and odorless, so you might not notice a leak without the right tool.
Store refrigerant cylinders upright in a cool, dry place. Keep them away from heat and open flames.
Never smoke or use open flames near refrigerant. Some types can catch fire or explode.
Know what to do in an emergency. If you get refrigerant on your skin or in your eyes, rinse right away and get medical help.
Tip: Only use certified equipment and follow local rules for storing and disposing of refrigerant. Never mix different types or vent them into the air.
Electrical Safety
You’ll work with wires and electrical parts during AC repairs. Take these steps to stay safe:
Disconnect the car battery before you start. This stops any accidental shocks or short circuits.
Remove the key from the ignition. This prevents any power from flowing while you work.
Watch out for hot engine parts. Some wires and connectors sit close to hot surfaces.
Use insulated tools when working with electrical systems. This adds an extra layer of protection.
Keep a fire extinguisher nearby. Make sure it’s rated for electrical and chemical fires.
Note: Always check for damaged wires or loose connections before you start. Fix these issues to avoid bigger problems later.
Workspace Preparation
A clean and organized workspace helps you avoid accidents and makes repairs easier. Here’s how to set up your area:
Gather all your tools and safety gear before you begin. Double-check that you have everything you need for the job.
Make sure your work area is dry and free from clutter. Spills or loose tools can cause slips or trips.
Support your car properly if you need to work underneath. Use jack stands, not just a jack.
Keep food and drinks out of the workspace. This prevents chemical contamination.
Follow all local safety and environmental rules, like the Clean Air Act and OSHA standards.
Have a first aid kit nearby. Know how to use it in case of minor injuries.
Callout: Take breaks and stay hydrated, especially if you’re working in a hot garage. Fatigue can lead to mistakes.
By following these safety steps, you protect yourself and your car. You also make sure your repairs go smoothly from start to finish.
How to Repair Automotive A/C
Getting ready to repair automotive a/c can feel overwhelming, but you can break it down into simple steps. Let’s walk through the process together, so you know exactly what to do and which tools to grab.
Diagnose the Problem
Before you start swapping parts or adding refrigerant, you need to figure out what’s wrong. Diagnosing the issue saves you time and money.
Visual Inspection
Start with a good look under the hood and inside your car. Here’s what you should check:
Look for oily spots or residue around the compressor, hoses, and connections. These often mean you have leaks.
Check for damaged hoses or worn-out parts.
Inspect the condenser for leaves, dirt, or bugs blocking the fins.
Remove the cabin air filter and see if it’s clogged with dust or debris.
Watch the blower motor. If it’s weak or silent, it might be failing.
Notice any water leaks inside the cabin. A clogged evaporator drain can cause this.
Smell the air from your vents. Musty or sour odors can point to mold or bacteria.
If you spot any of these problems, you’ve already narrowed down the cause. Sometimes, just cleaning or replacing a filter can fix weak airflow or bad smells.
Leak Test
Leaks are a common reason your a/c stops working. You need to check for leaks before adding refrigerant. Here are some popular methods and how they work:
Leak Test Method | Description | Detection Sensitivity / Rate |
Vacuum Test | Pull vacuum, isolate, and watch for pressure rise over an hour. | Finds big leaks by pressure changes. |
Pressure Rise Test | Pressurize system with nitrogen, watch for pressure drops. | Good for big leaks, not small ones. |
Sniffer Detection | Use a handheld device to sense escaping gas, even tiny leaks. | Very sensitive, finds small leaks. |
Helium Vacuum Method | Use helium in a vacuum chamber for super-precise leak detection. | Detects the smallest leaks possible. |
Dye Injection | Add dye to the system, then use a UV light to spot leaks visually. | Great for slow or hard-to-find leaks. |
Tip: A UV dye kit is easy for beginners. Just add the dye, run the a/c, and shine a UV light on the lines and connections. If you see glowing spots, you’ve found the leak.
Pressure Check
Checking the pressure tells you if your system has enough refrigerant or if there’s a deeper problem. Here’s how you do it:
Put on gloves and safety glasses.
Start your engine and set the a/c to max cool and fan speed.
Attach your manifold gauge set or an A/C Pro® pressure gauge to the low-pressure service port.
Read the pressure.
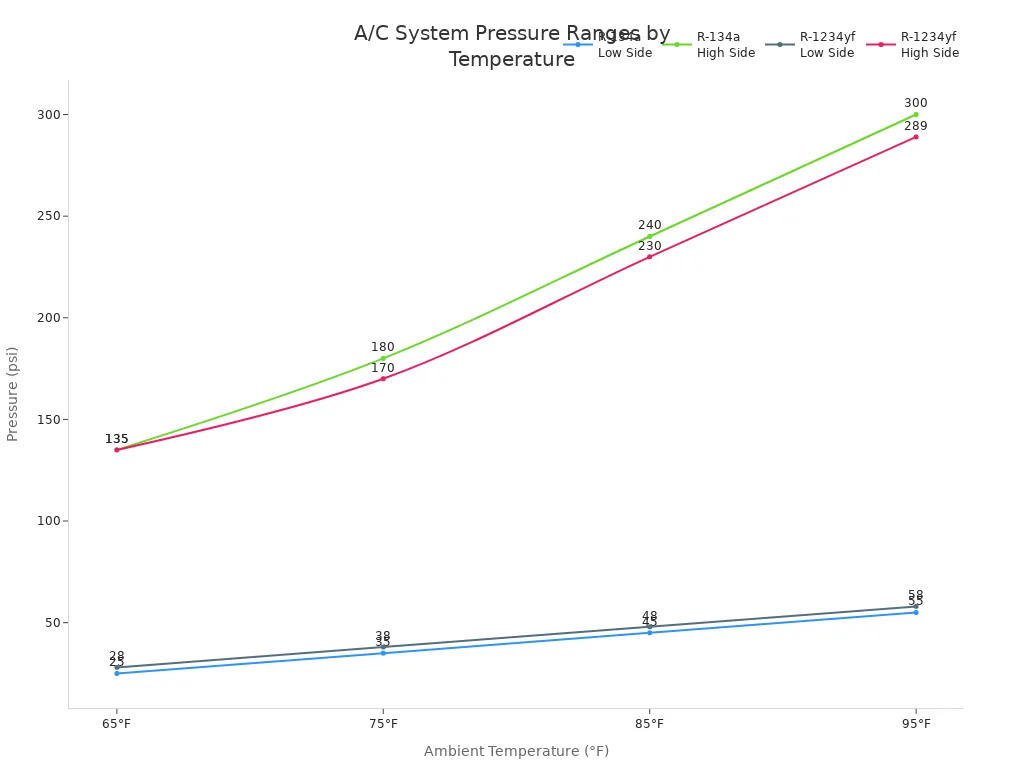
Compare your readings to the standard ranges. For most cars using R-134a refrigerant, the low side should be about 25–55 psi, and the high side should be 135–300 psi, depending on the outside temperature. For R-1234yf systems, the low side is usually 28–58 psi, and the high side is 135–289 psi.
If the pressure is too low, you might have a leak or need more refrigerant. If it’s too high, don’t add refrigerant—this could mean a blockage or overcharge.
Note: If your compressor isn’t turning on, but the pressure looks normal or high, low refrigerant might be causing the compressor to shut down. If the pressure is normal but the a/c still blows warm air, it’s time to get a professional to take a look.
Electrical Checks
Sometimes, the problem isn’t with the refrigerant or leaks. Electrical issues can stop your a/c from working. Here’s how you check the basics.
Fuse and Relay Test
Open your car’s fuse box and find the fuses and relays for the a/c system.
Look for any blown fuses or burnt relays. Replace them if needed.
Make sure all connections are tight and free of corrosion.
A blown fuse or bad relay is a quick fix and can get your a/c running again.
AC Clutch Engagement
Start your car and turn the a/c to the highest setting.
Watch the compressor pulley under the hood. The clutch should click and spin when the a/c is on.
If the clutch doesn’t engage, you might have an electrical issue or low refrigerant.
Callout: If you hear rattling or grinding noises, turn off the a/c right away. These sounds can mean compressor trouble.
Multimeter Use
A multimeter helps you test if power is reaching the compressor and other parts.
Set your multimeter to the AC voltage setting.
Insert the black lead into the COM jack and the red lead into the VΩ jack.
Connect the black lead to a ground point and the red lead to the compressor clutch coil.
With the a/c on, you should see a voltage close to your car’s battery voltage.
If you don’t see voltage, trace the circuit back to find the fault.
Tip: Healthy systems show voltage within -10% to +5% of the battery voltage. If you’re not getting power, check the relay, fuse, and wiring.
System Cleaning and Flushing
Keeping your a/c system clean helps it last longer and work better. You want to clean out your ac system, especially after repairs or if you notice debris.
Using a Flush Kit
Flushing removes old oil, metal shavings, and debris that can damage your compressor. Here’s how you do it:
Disconnect the compressor, expansion valve, and filter dryer. These parts shouldn’t be flushed.
Use an a/c flush kit with a flush solution and compressed air.
Attach the flush gun hose to the evaporator, condenser, and a/c lines one at a time.
Spray the solution through each part, catching the waste in a bucket.
Dry the system with compressed air or nitrogen.
Reinstall or replace the compressor and filter dryer as needed.
Add the correct amount of oil to the system.
Note: If you’re not comfortable with this step, it’s okay to ask a professional for help. Flushing is important after a compressor failure or if the system has been opened.
Cleaning Radiator and Filter
Remove the cabin air filter and replace it if it’s dirty.
Use a soft brush or compressed air to clean debris from the condenser fins.
Make sure nothing blocks airflow to the radiator or condenser.
Regular cleaning keeps your a/c blowing cold and prevents future problems.
Tip: Change your cabin air filter every three months and keep your car’s interior clean to reduce dust and mold.
Now you know the key steps to repair automotive a/c. With these tools and tips, you can handle most basic repairs and keep your car cool all summer.
Vacuum and Recharge
Pulling a vacuum and recharging the system are the final steps before you enjoy cool air again. These steps make sure your a/c works at its best and stays reliable.
Pulling a Vacuum
You need to pull a vacuum to remove air, moisture, and any leftover contaminants from your a/c system. If you skip this step, moisture can freeze or cause corrosion inside the lines. Here’s how you do it:
Connect your manifold gauge set to the high and low service ports.
Attach the vacuum pump to the center hose on the gauge set.
Turn on the vacuum pump. Let it run until the gauge shows a deep vacuum (–29 to –30 inHg or 500 microns).
Once you reach the right vacuum, close the valves on the gauge set to isolate the system.
Hold the vacuum for at least 15 minutes. Watch the gauge. If the pressure rises, you may have a leak or leftover moisture.
For most cars, the whole process takes about 30 minutes. Larger vehicles or humid days may need up to an hour.
Tip: A steady vacuum means your system is sealed and dry. If the gauge moves, check for leaks and repeat the process.
Pulling a vacuum protects your a/c from damage and helps it cool better. Take your time with this step for the best results.
Recharging Refrigerant
Now your system is clean and ready for refrigerant. Most cars use R-134a or R-1234yf. You can find the right type on a label under your hood or in your owner’s manual. Using the wrong refrigerant can damage your a/c, so double-check before you start.
Here’s a step-by-step guide to recharging:
Put on gloves and safety glasses.
Make sure you have the correct refrigerant and a recharge kit with a pressure gauge.
Work in a well-ventilated area. Avoid skin contact with refrigerant.
Check the outside temperature. Only recharge if it’s above 55°F.
Find the low-pressure service port (marked “L”). Clean it and remove the cap.
Attach the recharge hose to the port.
Start your car. Set the a/c to max cold and the fan to high.
Watch the pressure gauge. Add refrigerant in short bursts. Wait for the compressor clutch to engage (usually at 25–30 PSI).
Stop adding refrigerant when the gauge reaches the recommended level and the air from the vents feels cold (about 35–48°F if it’s 70–80°F outside).
Remove the hose and replace the service port cap.
Note: Don’t overcharge your system. Too much refrigerant can cause poor cooling or even damage the compressor.
If you follow these steps, you’ll finish the recharge safely. Your a/c should now blow cold air and run smoothly.
Replace Simple Components
Some a/c parts wear out or get dirty over time. You can replace these yourself with basic tools. This keeps your system running well and helps you avoid bigger repairs.
Cabin Air Filter
The cabin air filter traps dust and pollen before they reach your vents. If your a/c smells musty or the airflow feels weak, your filter might be clogged.
Find the filter behind the glove box or under the dashboard.
Open the cover and slide out the old filter.
Check for dirt, discoloration, or moisture.
If it’s a disposable filter, throw it away and put in a new one.
If it’s washable, clean it with a vacuum or hose, let it dry, and reinstall.
Tip: Replace or clean your cabin air filter every one to two months, especially if you drive in dusty areas.
Valve Core or Orifice Tube
The valve core and orifice tube help control refrigerant flow. If your a/c isn’t cooling, or if you hear odd noises, these parts might need attention.
Signs you need to replace them include poor cooling, the compressor not starting, or the compressor running all the time.
You might see cracks, debris, or discoloration on the orifice tube.
To replace the valve core, use a valve core tool to unscrew the old one and install a new one.
For the orifice tube, you’ll need to open the line, pull out the old tube, and push in a new one. Always check for debris or damage.
Note: If you see signs of moisture or damage near the cooling coil, replace the orifice tube to prevent bigger problems.
These simple replacements help you keep your a/c in top shape. You don’t need special skills—just patience and the right tools. By learning to repair automotive a/c, you save money and gain confidence in your DIY skills.
Troubleshooting
Weak Airflow
You turn on your ac, but the air barely moves. This problem can make even a short drive uncomfortable. Let’s look at the most common reasons for weak airflow and how you can fix them:
Dirty or Clogged Cabin Air Filter
The cabin air filter traps dust and debris before it enters your car. Over time, it gets clogged and blocks airflow. You can find the filter under the dashboard, behind the glovebox, or near the windshield base. Pull it out and check both sides for dirt. If it looks dirty, replace it. Vacuum the filter housing to remove leftover debris. This simple step often brings back strong airflow.
Failing Blower Motor
The blower motor pushes air through your vents. If you notice weak airflow even with a clean filter, turn the fan to max and listen. Grinding or squeaking noises mean the motor might be worn out. Check if the airflow changes with different fan speeds. If not, you may need to replace the blower motor.
Vent Control System Issues
Sometimes, the problem comes from stuck vent flaps. These flaps control where the air goes. Broken cables, vacuum leaks, or electrical faults can stop them from moving. If air only comes out of one vent or defaults to the windshield, check for broken cables or vacuum leaks. Fixing these can restore normal airflow.
Tip: Always start with the cabin air filter. It’s the easiest and cheapest fix for weak airflow.
Not Cooling
You set your a/c to cold, but warm air blows out. This issue can have several causes. Here’s what you should check:
Low Refrigerant Levels
Low refrigerant is a top reason for poor cooling. You can use a DIY recharge kit from an auto parts store to top it up. If you hear hissing when the ac is off or see oil around hoses, you might have a leak.
Leaks in Hoses, O-Rings, or Seals
Leaks let refrigerant escape. Look for oily spots near fittings. If you find any, you’ll need to fix the leak before recharging.
Compressor Problems
The compressor is the heart of your a/c system. If it fails, you’ll get warm air. Listen for odd noises near the engine or check if the compressor clutch engages when you turn on the ac.
Fan or Condenser Issues
Broken fans or blocked condensers stop the system from cooling. Make sure the fans spin when the ac is on. Clean any debris from the condenser.
Electrical or Sensor Faults
Blown fuses, bad wiring, or faulty sensors can stop the system from working. If the ac cycles on and off or never starts, check the fuses and relays first.
Note: If you try these steps and still get warm air, it’s time to see a professional. Some problems need special tools or skills.
Noises or Smells
Strange noises or bad smells from your a/c can mean trouble. Here’s what to watch for:
Musty or Moldy Odors
A musty smell often means mold or mildew inside the evaporator. Moisture gets trapped and creates a perfect spot for bacteria. Replace the cabin air filter and check the drain tube for clogs. You can also spray antiseptic into the exterior vents to kill mold.
Sweet or Chemical Smells
A sweet, syrupy odor points to a coolant or refrigerant leak. Gasoline-like smells can also mean refrigerant is escaping. These leaks need quick attention to prevent bigger problems.
Burning Smells
Burning odors signal overheating parts like the compressor or clutch. Turn off the ac right away and get help.
Unusual Noises
Squealing or grinding sounds when you turn on the ac usually come from the compressor, fan, or drive belt. These noises mean something is worn out or broken.
Callout: Don’t ignore strange smells or noises. They can lead to bigger repairs or even health risks if left unchecked.
When to Seek Help
Sometimes, you do everything right, but your car’s AC still acts up. Not every problem is safe or simple to fix at home. Knowing when to call a professional can save you time, money, and stress. Here are some clear signs that you should let an expert handle the repair:
Strong Mold or Mildew Smell
If you notice a powerful musty odor every time you turn on the AC, you might have mold growing deep inside the system. Replacing the cabin filter helps, but stubborn smells often mean you need a professional to clean or inspect the AC.
No Air Coming From the Vents
When you turn on the fan and nothing happens, the issue could be a blown fuse, a bad blower motor, or even a broken belt or hose. These parts can be tricky to reach and diagnose. A mechanic has the right tools to find and fix the problem safely.
AC Not Blowing Cold Air
If your AC only blows warm air, you might have a refrigerant leak. Finding and repairing leaks takes special equipment and training. Adding more refrigerant without fixing the leak can damage your system.
Temperature Fluctuations
Does your AC start cold but turn warm after a few minutes? This could mean a faulty expansion valve or a problem with the compressor clutch. These repairs require a certified technician.
Weak Airflow That Won’t Improve
If you’ve changed the cabin filter and cleaned the vents but still get weak airflow, you might have debris stuck in the fan, blocked air inlets, or damaged seals. These issues often need professional cleaning and repair.
Unusual or Pungent Odors
Smells like vinegar, burning rubber, or chemicals can signal serious problems. You could have bacterial buildup, battery acid leaks, or dust burning inside the system. These are not safe to handle on your own.
Wet Spots on Floor Mats
Damp patches under the dashboard or on your floor mats usually mean a blocked drain or leaking AC pipes. Water leaks can damage other parts of your car if left untreated.
Weird Noises
Rattling, clicking, vibrating, or bubbling sounds from your AC are warning signs. These noises can point to compressor failure, objects stuck in the blower, hose problems, or even overcharged refrigerant. These repairs need special tools and know-how.
Tip: If you ever feel unsure or the repair seems too big, trust your instincts. It’s always better to ask a professional than risk making things worse.
Major repairs like replacing the compressor, fixing electrical wiring, or finding hidden leaks need special skills and equipment. You don’t have to do everything yourself. Calling a pro keeps you safe and protects your car. Remember, knowing when to seek help is part of being a smart DIYer!
Tips and Benefits
Avoiding Mistakes
You want your car AC repair to go smoothly, so let’s talk about the most common mistakes beginners make and how you can steer clear of them. Many people think adding more refrigerant will fix everything. If you top up refrigerant without measuring the exact amount, you risk damaging your compressor. Even a small mistake—like being just 10% low—can cut oil flow by almost half. That means your compressor could fail before you even notice a drop in cooling.
Another mistake is grabbing the wrong refrigerant can from the store. Some cans contain hydrocarbons like propane or butane, not the R134a your car needs. Using the wrong type can damage your system and even be dangerous. Always check the label and use the correct refrigerant.
Don’t forget about regular maintenance. Your AC system loses a bit of refrigerant every year. If you skip service for too long, you might face expensive repairs. Running your AC for a few minutes every month—even in winter—keeps the compressor healthy.
Here are a few more things to watch for:
Blocked condensers from leaves or dirt can stop your AC from cooling well. Clean the grille and air intakes often.
Faulty fans or electrical issues can be tricky. If you notice strange noises or weak airflow, get a professional to check it out.
Oily spots near hose connections often mean a leak. Don’t ignore them—fix leaks quickly to avoid bigger problems.
Tip: When in doubt, ask a pro. Some repairs need special tools and training.
Keeping a Repair Log
You might not think about keeping a repair log, but it can save you headaches later. Write down every repair, part replacement, and recharge you do. Note the date, what you fixed, and any parts or refrigerant you used. This simple habit helps you spot patterns if problems come back. You’ll also have a record to show a mechanic if you ever need help.
A repair log can look like this:
Date | Repair/Service | Parts/Refrigerant Used | Notes |
04/10/2024 | Replaced cabin filter | New filter | Airflow improved |
05/15/2024 | Recharged refrigerant | 12 oz R134a | System cooling normal |
Keeping track makes you a smarter DIYer and helps your AC last longer.
DIY Advantages
Fixing your car’s AC yourself comes with real benefits. First, you save money. Professional repairs can cost hundreds, but with the right tools and a little patience, you can handle many fixes at home. You also learn new skills and gain confidence. Each repair teaches you more about your car.
DIY repairs let you work on your own schedule. No need to wait for an appointment or leave your car at the shop. You control the process and know exactly what goes into your system.
You also help your car last longer. Regular cleaning and maintenance prevent bigger problems down the road. Plus, you get the satisfaction of solving problems yourself.
Callout: Every successful repair is a win. Celebrate your progress and enjoy the cool air you worked for!
You now know the essential tools and steps to tackle basic ac repairs with confidence. Take your time, enjoy the process, and celebrate each win. By handling your own ac fixes, you can save between $80 and $250 compared to professional service. Want to learn more? Check out these helpful resources:
Guides explaining how automotive ac systems work
Tips for finding and fixing refrigerant leaks
Advice on when to seek professional help
FAQ
How often should you check your car’s AC system?
You should check your AC system at least once a year, usually before summer. Regular checks help you catch leaks or worn parts early. This keeps your AC running strong and saves you money.
Can you recharge your car’s AC without professional help?
Yes, you can recharge your AC at home with a recharge kit and pressure gauge. Always follow the instructions and use the correct refrigerant. If you feel unsure, ask a pro for help.
What if you add too much refrigerant?
Too much refrigerant can damage your compressor and reduce cooling. If you notice poor performance after recharging, stop using the AC. Let a professional remove the excess safely.
Do you need to replace the cabin air filter often?
You should replace the cabin air filter every 1-2 months, especially if you drive in dusty areas. A clean filter keeps airflow strong and prevents bad smells.
What tools do you need for basic AC repairs?
You need a manifold gauge set, vacuum pump, flush kit, leak detector, screwdrivers, wrenches, gloves, and safety glasses. Most auto parts stores carry these tools.
Is it safe to use DIY leak sealers?
DIY leak sealers can clog your AC system and cause bigger problems. It’s better to find and fix leaks with proper tools. If you’re not sure, let a professional handle it.
Why does your AC smell bad when you turn it on?
A musty or sour smell usually means mold or bacteria in the system. Replace the cabin air filter and clean the vents. If the smell stays, you may need a deep cleaning.
What should you do if your AC still doesn’t work after repairs?
If your AC still blows warm air or makes strange noises, stop and call a professional. Some problems need special tools or skills. Don’t risk bigger damage by guessing.